
Hello All,
Addiction quilling! These two words sum up my state right now! Hehehe. In the Indian Quilling Guild on Facebook, there started a discussion about how to prevent dust from settling on our quilling projects! It IS a big problem in India, where things are dusty. Well, for bigger projects, one can always use shadow boxes but what about those cute little gift boxes we want to adorn with quilling?
Ah well, my idle mind got to work (actually, I had been thinking about it for quite a while now, since Aditi posted the query on IQG page!) and today, finally I could finalize the design of my dust-proof DIY project for quilling boxes :)
This is how they looked at the end (sorry for the bad quality picture):

The materials I have used are:
300 gsm Indigo card paper
Overhead projector transparency sheet
Voila! That is ALL that you need. Here is the video (pls excuse the background noises, I don't want to overwrite the sound at midnight :D):
As with my previous tutorial, the possibilities of variations are literally endless! You can change the shapes (and modify the sketch accordingly). I will try to post templates for triangular, circular and hexagonal boxes but feel free! ANY shape is possible if you work on the design.
I haven't pasted anything on the inside base but if you want, you can paste a scrap paper there and beautify te box even further. The upper edge of the transparent part can also be adorned with various embellishments. Just GO AHEAD an tinker around, let your creativity loose.
I don't yet know how to upload a downloadable document in a blog (I wanted to use only an A4 sheet, so I stuck to that but you can vary the sizes as you wish) but here is the image:

I used 2 cm depth for quilling motifs but you can vary the depth depending on what type of quilling you want there. I took a picture of the template I used and here it is:

The dotted lines are for folding and the solid lines are for cutting. Except for the inner square on right side. It is for cutting but I wanted to be able to see the pencil line underneath so I have made it dotted. The final dimension of the box is 10 cm x 10 cm. What I have made is the lid, you can make the box underneath, using any simple paper folding box tutorial from Internet. :) I have used some random quilling elements I had handy for pasting in the box but you go ahead - design your own! As I always say: Sky is just the beginning! :)
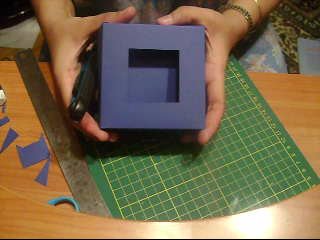
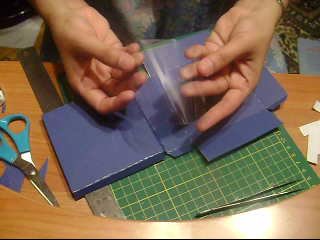
And well, my traditional video snapshots (in honour of Dr. Sonia, who is an AMAZING crafter and never refrains from posting tutorials of her work) follow:


Entering this for Pollycraft challenge (#122 Anything but a card)...
Happy Quilling
Pritesh
PS: If my posts inspire you to create something on similar lines, I feel highly flattered. But please, do respect the effort I take in conceptualizing and executing, please give a direct link to my work when you are inspired by mine. Thanks for understanding........:-)
Addiction quilling! These two words sum up my state right now! Hehehe. In the Indian Quilling Guild on Facebook, there started a discussion about how to prevent dust from settling on our quilling projects! It IS a big problem in India, where things are dusty. Well, for bigger projects, one can always use shadow boxes but what about those cute little gift boxes we want to adorn with quilling?
Ah well, my idle mind got to work (actually, I had been thinking about it for quite a while now, since Aditi posted the query on IQG page!) and today, finally I could finalize the design of my dust-proof DIY project for quilling boxes :)
This is how they looked at the end (sorry for the bad quality picture):

The materials I have used are:
300 gsm Indigo card paper
Overhead projector transparency sheet
Voila! That is ALL that you need. Here is the video (pls excuse the background noises, I don't want to overwrite the sound at midnight :D):
As with my previous tutorial, the possibilities of variations are literally endless! You can change the shapes (and modify the sketch accordingly). I will try to post templates for triangular, circular and hexagonal boxes but feel free! ANY shape is possible if you work on the design.
I haven't pasted anything on the inside base but if you want, you can paste a scrap paper there and beautify te box even further. The upper edge of the transparent part can also be adorned with various embellishments. Just GO AHEAD an tinker around, let your creativity loose.
I don't yet know how to upload a downloadable document in a blog (I wanted to use only an A4 sheet, so I stuck to that but you can vary the sizes as you wish) but here is the image:

I used 2 cm depth for quilling motifs but you can vary the depth depending on what type of quilling you want there. I took a picture of the template I used and here it is:

The dotted lines are for folding and the solid lines are for cutting. Except for the inner square on right side. It is for cutting but I wanted to be able to see the pencil line underneath so I have made it dotted. The final dimension of the box is 10 cm x 10 cm. What I have made is the lid, you can make the box underneath, using any simple paper folding box tutorial from Internet. :) I have used some random quilling elements I had handy for pasting in the box but you go ahead - design your own! As I always say: Sky is just the beginning! :)
And well, my traditional video snapshots (in honour of Dr. Sonia, who is an AMAZING crafter and never refrains from posting tutorials of her work) follow:
Entering this for Pollycraft challenge (#122 Anything but a card)...
Happy Quilling
Pritesh
PS: If my posts inspire you to create something on similar lines, I feel highly flattered. But please, do respect the effort I take in conceptualizing and executing, please give a direct link to my work when you are inspired by mine. Thanks for understanding........:-)


