Friday, September 30, 2011

Hermione Granger with her polyjuice potion :-)

When a die-hard Harry Potter fan's birthday is approaching, what does a quiller do? Quill something from Harry Potter, of course! :D But but but.........what to quill when the B'day boy lives, breathes, dreams Hermione Granger? Oh well...............you'd say quill a Hermione Granger :) Not easy, but definitely worth it........so here goes, Hermione Granger, from Book 2 (Harry Potter and the Chamber of Secrets), making polyjuice potion.


Specifications:

Black: 130 gsm black paper
Pot: 130 gsm bronze paper
Brown hair: 130 gsm brown paper
Face and hands: 130 gsm beige paper
Books: Cut up newspaper, bound in 130 gsm black paper
Hair strands in her hand: Stitching thread in black colour
Scarf: White silk braid, from a greeting card

Happy Quilling :-)

PS: If my posts inspire you to create something on similar lines, I feel highly flattered. But please, do respect the effort I take in conceptualizing and executing, please give a direct link to my work when you are inspired by mine. Thanks for understanding........:-)

Thursday, September 29, 2011

Finished quilled chess set :)

Finally, I have manages to finish the quilling chess set. I know, I know I should post a tutorial but I swear, I just don't have time right now. I sure WILL, I promise, as soon as I get time. The household and job commitments are too many right now!


Happy Quilling

PS: If my posts inspire you to create something on similar lines, I feel highly flattered. But please, do respect the effort I take in conceptualizing and executing, please give a direct link to my work when you are inspired by mine. Thanks for understanding........:-)

Tuesday, September 27, 2011

A congratulations Frame

Curls and swirls were always my forte but never ever did I imagine that I will be able to make money out of Art I did (much to the chagrin of my mother) at the back of my school notebooks. I so vividly remember waiting to have mehendi/henna times so that I could further practice these curls and swirls :-) Here is my first completed (and dispatched) order :-)


I am particularly happy about this one because it was my concept from the beginning till the end. I wrote to poem myself (something I intend to continue, writing!) and then, quilled the surroundings. As always, here are the details:

Base: 80 gsm beige printing paper, 130 gsm black paper, cut and pasted on right side
Black 'stems': 300 gsm black chart paper
Black 'leaves': 130 gsm black paper
Flower: 80 gsm beige printing paper + 130 gsm black paper
Beige details: 80 gsm printing paper

PS: If my posts inspire you to create something on similar lines, I feel highly flattered. But please, do respect the effort I take in conceptualizing and executing, please give a direct link to my work when you are inspired by mine. Thanks for understanding........:-)

I hope the person who ordered it receives it in good shape and likes it too :)

This is my entry to Kathy's challenge for September 2011:

Happy Quilling :)

Wednesday, September 21, 2011

Wedding Congratulations Card

Hello All,

I am sorry that I haven't been really able to post a tutorial for any of my works as of now. I just haven't had the time, with a small child in the house and a full time job on my hand. I have, though, tried to put together a sort of step by step image explaining how to make the petals (that is the only tricky part here) in


I used 80 gsm beige printing paper strips (~ 3 mm width, they are hand-cut hence not a very constant width) for the petals. One strip was 12 inches long. I used a technique called Husking (Inna explains it much better than I do, she has great photos to accompany the instructions) for making the petals. My own amateurish attempt at explaining husking is here


After making the petals, I used a gold glitter pen to do gilding (basically, I followed the paper edge with pen tip). It gave a beautiful rich effect. I pasted 5 petals on a rectangle I drew in the upper half a 200 gsm (A4 folded into half) off-white paper. The leaves has been made using a bright green 80 gsm printing paper (which was about to be thrown away for being 'discoloured'). The leaves were shaped using the quilling board I bought from Artystree :-)  On the lower half of the card, I pasted a ribbon piece (which came off a box of sweets from Doha! I am a GREAT fan of recycling), made a bow and pasted on top of it.


The gold swirls on the rectangle were an afterthought really. The card looked barren without them. The core of the flower is a 5 mm width,10 inch long yellow paper strip, tight coiled and gilded with gold pen (on the side though, not on top, I wanted the yellow colour to show). In the centre, I have stuck a pearl. Between each petal, I stuck 1 pearl each to give richness to the look. The buds are again made of the beige paper, 3D coiled to make a cone. The "Congrats Bikash and Ivy" is my own hand-writing (hence the unevenness). I wish I had printed it but then, there was no time.

So, here goes a sort of tutorial. I will post better tutorials once I have the time!

Happy Quilling

PS: If my posts inspire you to create something on similar lines, I feel highly flattered. But please, do respect the effort I take in conceptualizing and executing, please give a direct link to my work when you are inspired by mine. Thanks for understanding........:-)

Monday, September 19, 2011

Quilled Frog Pond

And well, here comes my first (informal) professional work.........a quilled pond. I love the way it is turning out. I like the frog, the lilies, the insects (though I must admit they look rather large to me!).........the progress........


I will post a final picture once I am through with making the entire piece :-)

PS: If my posts inspire you to create something on similar lines, I feel highly flattered. But please, do respect the effort I take in conceptualizing and executing, please give a direct link to my work when you are inspired by mine. Thanks for understanding........:-)

Quilled Orchids

Now that I am equipped with the quilling tools I bought from Artystree, it is so much easier to make shapes in regular sizes. I wanted to try my hand at something like that and orchids always come in hand. Equipped with how Inna Dorman had quilled orchids once, I decided to give it a try. I have done it slightly differently compared to hers but I am satisfied with the result :-)

The flowers have been made using the 1.5 cm circle in the quilling designer board (top left circle). For the bigger petals, I made the whorl and pressed two together. The darker pink are single whorls. The leaves have been folded by hand. I don't particularly like husking, so I fold them by hand. But looks like, I will need to husk leaves more often! :D


Base: 500 gsm white carton paper covered with beige (80 gsm) printing paper
Flowers: 120 gsm pink (two shades) and 80 gsm red paper
Leaves: 80 gsm dark green printing paper
Frame: 500 gsm carton paper readymade frame from Gallerix.

PS: If my posts inspire you to create something on similar lines, I feel highly flattered. But please, do respect the effort I take in conceptualizing and executing, please give a direct link to my work when you are inspired by mine. Thanks for understanding........:-)

Tuesday, September 13, 2011

Quilling Chess Set

I am currently onto quilling a chess set, a project for a friend's anniversary. I had no idea that it will be so well liked or that there are kits available for quilling an entire set. But well, people are likely to come up with similar ideas with a similar raw material. The work is still under progress and I am hoping to be able to finish it in about 10 days or so. I only get this much time per day to do it :-) Some WIP (work-in-progress) pictures:


The toughest part of this project is to get a design for the pieces in your head. Translating them to quilling is not so difficult (until I came to the Knight). Ordinary white and black 120 gsm paper is what I am using as of now (except for the bases of non-pawn pieces) which is 300 gsm chart paper

Wednesday, September 7, 2011

Anthuriums - an eternal obsession

One flower that never stops amazing me is Anthurium. The simple structure of the flower, it's snake like shape (snakes are my favourite animals, anyway!)......everything about it begs to be quilled. So, here I am, with anthuriums (though the anthuriums themselves are not quilled, the over all card is) and quilling. A birthday greeting for a special elder person I know :) I hope he likes it when he gets it


Base: 250 gsm brown metallic paper
White: 200 gsm sketching paper
Yellow and Green: 80 gsm printing paper
Writing: Gold glitter gel pen
Wish: Printed on 80 gsm printing paper

Happy Quilling :)

PS: If my posts inspire you to create something on similar lines, I feel highly flattered. But please, do respect the effort I take in conceptualizing and executing, please give a direct link to my work when you are inspired by mine. Thanks for understanding........:-)

Monday, September 5, 2011

Invictus

If I was ever to pick up ONE favourite poem, THIS would be it! The words are so "on-the-mark" for the kind of person I am! And so so very inspiring too! This piece is for Hema, who is being of such help by re-posting my quilling supplies. Thanks a lot Hema :-)


Base: 250 gsm metallic grey A4 paper
Red: 80 gsm printing paper
Beige: 120 gsm colour paper
Writing: White and Silver gel pens, poem by William Ernest Henley

Happy Anniversary

This Anniversary card is for a friend, the first one I am doing some personalized gifts work for. I can never be thankful enough to her for getting me started into it.......


Base: 250 gsm black chart paper
Beige: 120 gsm coloured paper
Writing: Gold glitter pen (poem from The Best is Yet to Be)

PS: If my posts inspire you to create something on similar lines, I feel highly flattered. But please, do respect the effort I take in conceptualizing and executing, please give a direct link to my work when you are inspired by mine. Thanks for understanding........:-)

Quilled Garden

Now that I am reasonably well versed with quilling, I wanted to try to makw fringed flowers, double fringed flowers and so on. I meant this to be a gift for a friend but changed my mind later as this looked a little ad-hoc. I made her something that will come in later posts. She so humble agreed to re-post my quilling supplies. For some reason, the best quilling supplies are available only in US or UK. I wish they start sourcing them to India soon......:-)


Base: 500 gsm carton paper - covered with 200 gsm Orange scrapbooking paper
Bronze base: Lined bronze scrapbook paper
Dark Green: 250 gsm chart paper
Light Green: 120 gsm A4 paper
White: 250 gsm chart paper
Red and Yellow: 80 gsm printing paper


PS: If my posts inspire you to create something on similar lines, I feel highly flattered. But please, do respect the effort I take in conceptualizing and executing, please give a direct link to my work when you are inspired by mine. Thanks for understanding........:-)

Friday, September 2, 2011

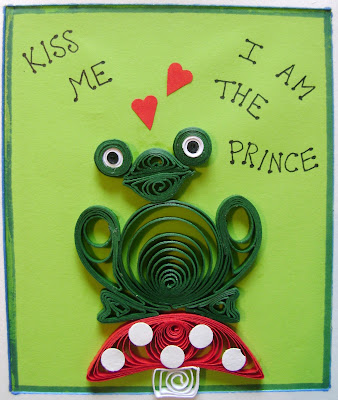
The Ugly Prince

Once in a while, one needs a project to just unwind. That is how I chanced upon this idea. A little Internet search later, I had the final project in my head! :-) Here goes.........


Base: 250 gsm white sketching paper
Green background: 80 gsm green printing paper
Frog green: 300 gsm chart paper
White (eyes and mushroom spots): 120 gsm printing paper
Red (hearts and mushroom): 80 gsm printing paper
Dots on mushroom: Circles from a simple paper punch


PS: If my posts inspire you to create something on similar lines, I feel highly flattered. But please, do respect the effort I take in conceptualizing and executing, please give a direct link to my work when you are inspired by mine. Thanks for understanding........:-)