Friday, June 28, 2013

Make your own half-pearls - Tutorial

Hello All,

This post may sound specific to Indian crafters but essentially can be used by crafters anywhere. In India, I find it particularly difficult to find large half pearls. In Pune, I still haven't been able to locate one single source. And besides, their colours are limited. So, what do I do? :D Make my own pearls, obviously! ;) Necessity is the mother of invention, after all! :D :D

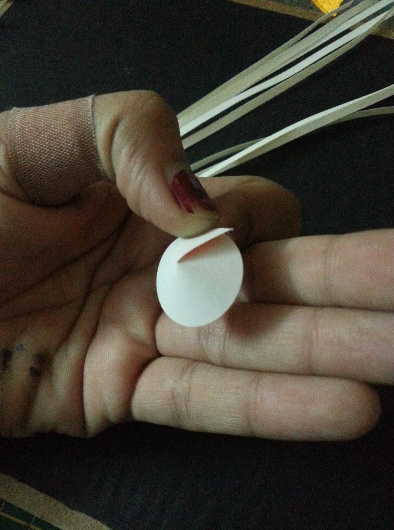
Here is a picture tutorial.

Materials used:

1. Children's colour palette (available for Rs. 6 in Venus Traders, Pune). It should be easily available practically everywhere!
2. Air-dry clay (I bought mine from Panduro Hobby in Stockholm but it should be easily available in most stores. M-Seal and Polymer Clay are other options that should work).
3. Fevicryl pearl paints (I have used pearl metallic white here, but feel free to choose from nearly 25 shades available with them). In addition, you can create patterns on top as well! Feel free to experiment.........


These make very exciting flower cores, according to me :) So, whether it is a quilled flower or punch flower, this core will make it very easy for you to choose exactly what shade of the the "pearl" you want in the centre :)

Some follow-up pictures..........you can use a 3D mini-mold to make pearls in a variety of sizes. Like this:


And they end up looking like this (these are crude still, unpainted)


Happy Quilling

Pritesh

PS: If my posts inspire you to create something on similar lines, I feel highly flattered. But please, do respect the effort I take in conceptualizing and executing, please give a direct link to my work when you are inspired by mine. Thanks for understanding........:-)

Saturday, June 15, 2013

Tutorial - Dimension addition to quilled flowers

Hello All,

I'm sure most of us have seen quilled flowers that are neatly off the base and look like you could pluck them off the board :) There exist methods to make such "dimension added" flowers. One of the methods is to use silicone (it's not silicon peoples, silicon is blackish blue in colour and very hard) glue. I, as a crafter, find it messy. Even as a researcher, I never found it an easy material to work with. Having cured silicone for almost a year for a research project will keep me away from it for life! :D

A sample of how flowers made using the technique demonstrated below can be used to make a frame:


So, I used a technique I had learnt in class II as a replacement, namely, using a paper cone. Here is a photo tutorial to demonstrate how.........this one goes out specially to Manjit Kaur Bhalla, who asked me for the tutorial :)


Happy Quilling

Pritesh

PS: If my posts inspire you to create something on similar lines, I feel highly flattered. But please, do respect the effort I take in conceptualizing and executing, please give a direct link to my work when you are inspired by mine. Thanks for understanding........:-)

Friday, June 7, 2013

Quilled National Bird.........

Dear All,

Quilling a peacock had been a long-standing dream of mine :) So, when Shital asked me if I would do a peacock, I jumped but almost immediately followed panic attacks. For anyone who has seen a peacock up close, figuring the plume colours out is like trying to count the number of cells in out body! It's a spectacularly beautiful bird, and correspondingly difficult to quill!!!!!

Here we go with the finished project :)


Stage 1 was simplified greatly by Shital by providing the base on which  the peacock was to be made. And Stage 2 stumped me for quite some time. The correct blue was impossible to find in shimmer texture. I scoured the old city markets but the correct blue seems to have disappeared from the face of this Earth! Bless Fevicryl, they keep coming up with products that have often been life savers for my craft needs!!!!!

The latest (HEAVILY recommended) range of sparkle paints came to my rescue. The hues in these paints are brilliant and affordability? Ah, Fevicryl style, they are extremely reasonably price :) So, I took the waste paper left over from paper cutting for text strips and painted sheets after sheets in the blues and greens. I wish I had taken photos of that too! Thanks to high humidity, the papers took forever to dry and forever looked soggy from all the paint......

To make the body of the peacock look 3D, I resorted to Panduro air-dry clay. I'm no clay expert, so please excuse the undulated surface! :D I randomly cut out another waste paper (left over from sample printing) into  peacock body shape and adjusted clay to the shape.


Making the peacock body feathers was the most strenuous part of this project. I used my Martha Stewart teardrop punch for punching out really small tear drops of the sparkling blue paper. Then started the arduous task of fringing these teardrops with a width of ~ 0.3 mm. My eyes are probably hurting because of this strain ;) But after about 300 of these, the upper body of the peacock began to take shape :)


Peacock doesn't really make your life easy! :D It's "flying wings" are random shades of black, white and brick red. My empirical methods came to the rescue! :D I drew random lines on white paper and thus resulted the flying wings of the peacock :)


The plume "base" was again air-drying clay, flattened to provide a shallow base for the feathers to rest on top.

It was the GREEN of the feathers that took maximum creativity! Phew! I have used Sparkle Pearl Green by Fevicryl as the base. On top went hints of Sparkle Pearl Blue and Sparkle Pearl Violet. The slightest tinges of brownish are Daler Rowney Bronze acrylic paint, which was used by dabbing a cotton ball in the paint and then tinging VERY lightly over the feather. This "process" took almost 15 iterations to get right! My room looks like a peacock has been beaten to death there, with so many "feathers" lying around! ;)


The "eyes" of the feathers are made out of 1 mm strips hand-cut out of 120 gsm beige shimmer paper. The tight coils were shaped and then, coloured from top. The colours remain the same, except green, which is Pearl Green by Fevicryl.


The rest, I think, is pretty self-explanatory. :) I HAVE TO thank my feedback system here :) 

The first in this list is Pri, who communicated right at 6 am or so (IST) and planted the 1 mm strips idea in my head :) You're a DARLING lady! You have no idea that I owe you my career :)

Second is a very what-you-see-is-what-you-get lady, who has never let me down. She always provides honest feedback, whether I like it or not ;) So, a MILLION thanks Ketaki

My life line, my baby, Baba always has been a pillar of strength, the one who managed to talk me into quilling, in the first place! :D As always, her feedback was forever available, so that Didi never wavered from her task at hand :)

One lady who has never failed at giving me feedback, that too in detail, is Manu. She diligently writes back, not just with feedback but also, suggestions about what and how I can use to make my projects better. 

And yeah, thanks to other people who put up with my incessant Whatsapp messages! Thanks Tarun, Sanasi, Meg, Yamini! You guys mean a LOT! Keep twisting my ears whenever you feel I'm losing focus :) 

Happy Quilling

Pritesh

PS: If my posts inspire you to create something on similar lines, I feel highly flattered. But please, do respect the effort I take in conceptualizing and executing, please give a direct link to my work when you are inspired by mine. Thanks for understanding........:-)